Ana içeriğe atla

· 7 dakika okuma

In this post, I will explain the design and implementation of RBAC using the Casbin library. For a SaaS platform dealing with multiple resource hierarchies and roles that inherit permissions from higher levels, Casbin provides a performant alternative to consider.

Introduction to RBAC

RBAC is a method of restricting access to resources based on the roles that individuals hold. To better understand how hierarchical RBAC works, let's take a look at Azure's RBAC system in the next section and then attempt to implement a similar system.

Understanding Azure's Hierarchical RBAC

Azure Hierarchy

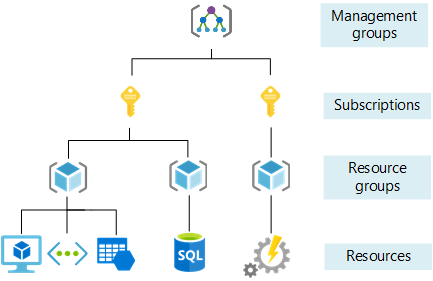
There is a role called Owner for all resources in Azure. Suppose if I have the Owner role assigned to me at the subscription level, that means I am the Owner of all the resource groups and resources under that subscription. If I have Owner at the resource group level, then I am the Owner of all the resources under that resource group.

This image shows that I have Owner access at the subscription level. Subscription Owner

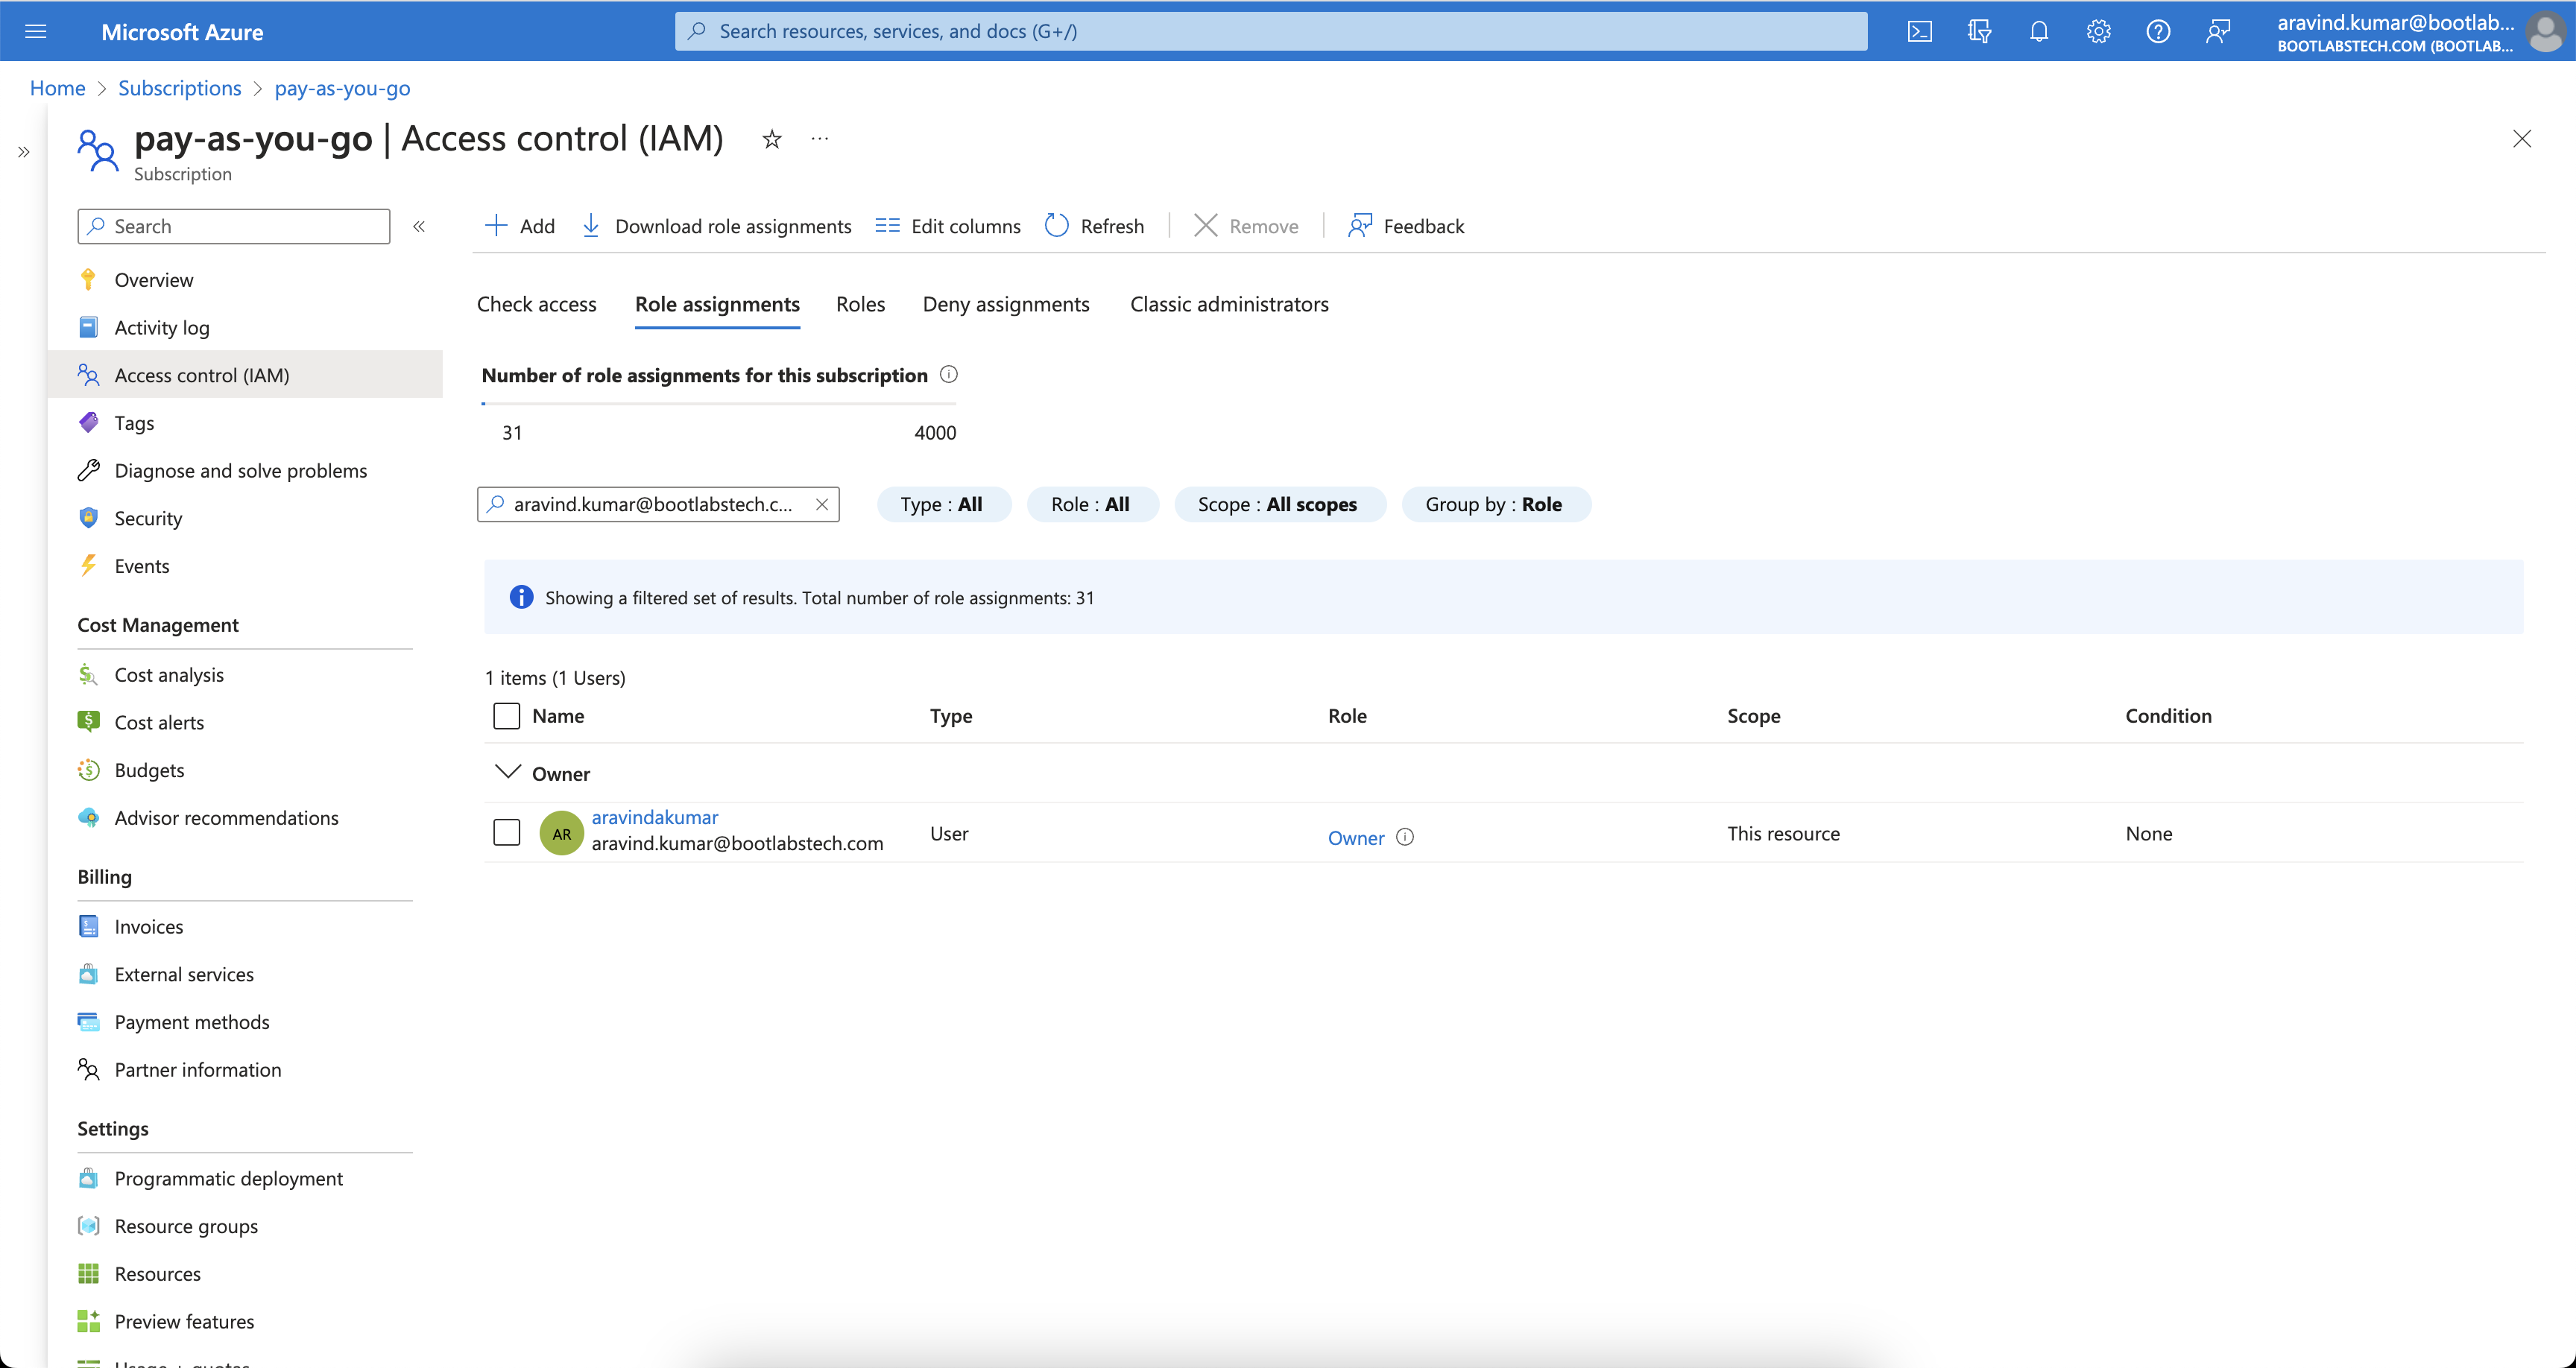
When I check the IAM of a Resource Group under this Subscription, you can see that I have inherited Owner access from the subscription. RG Owner

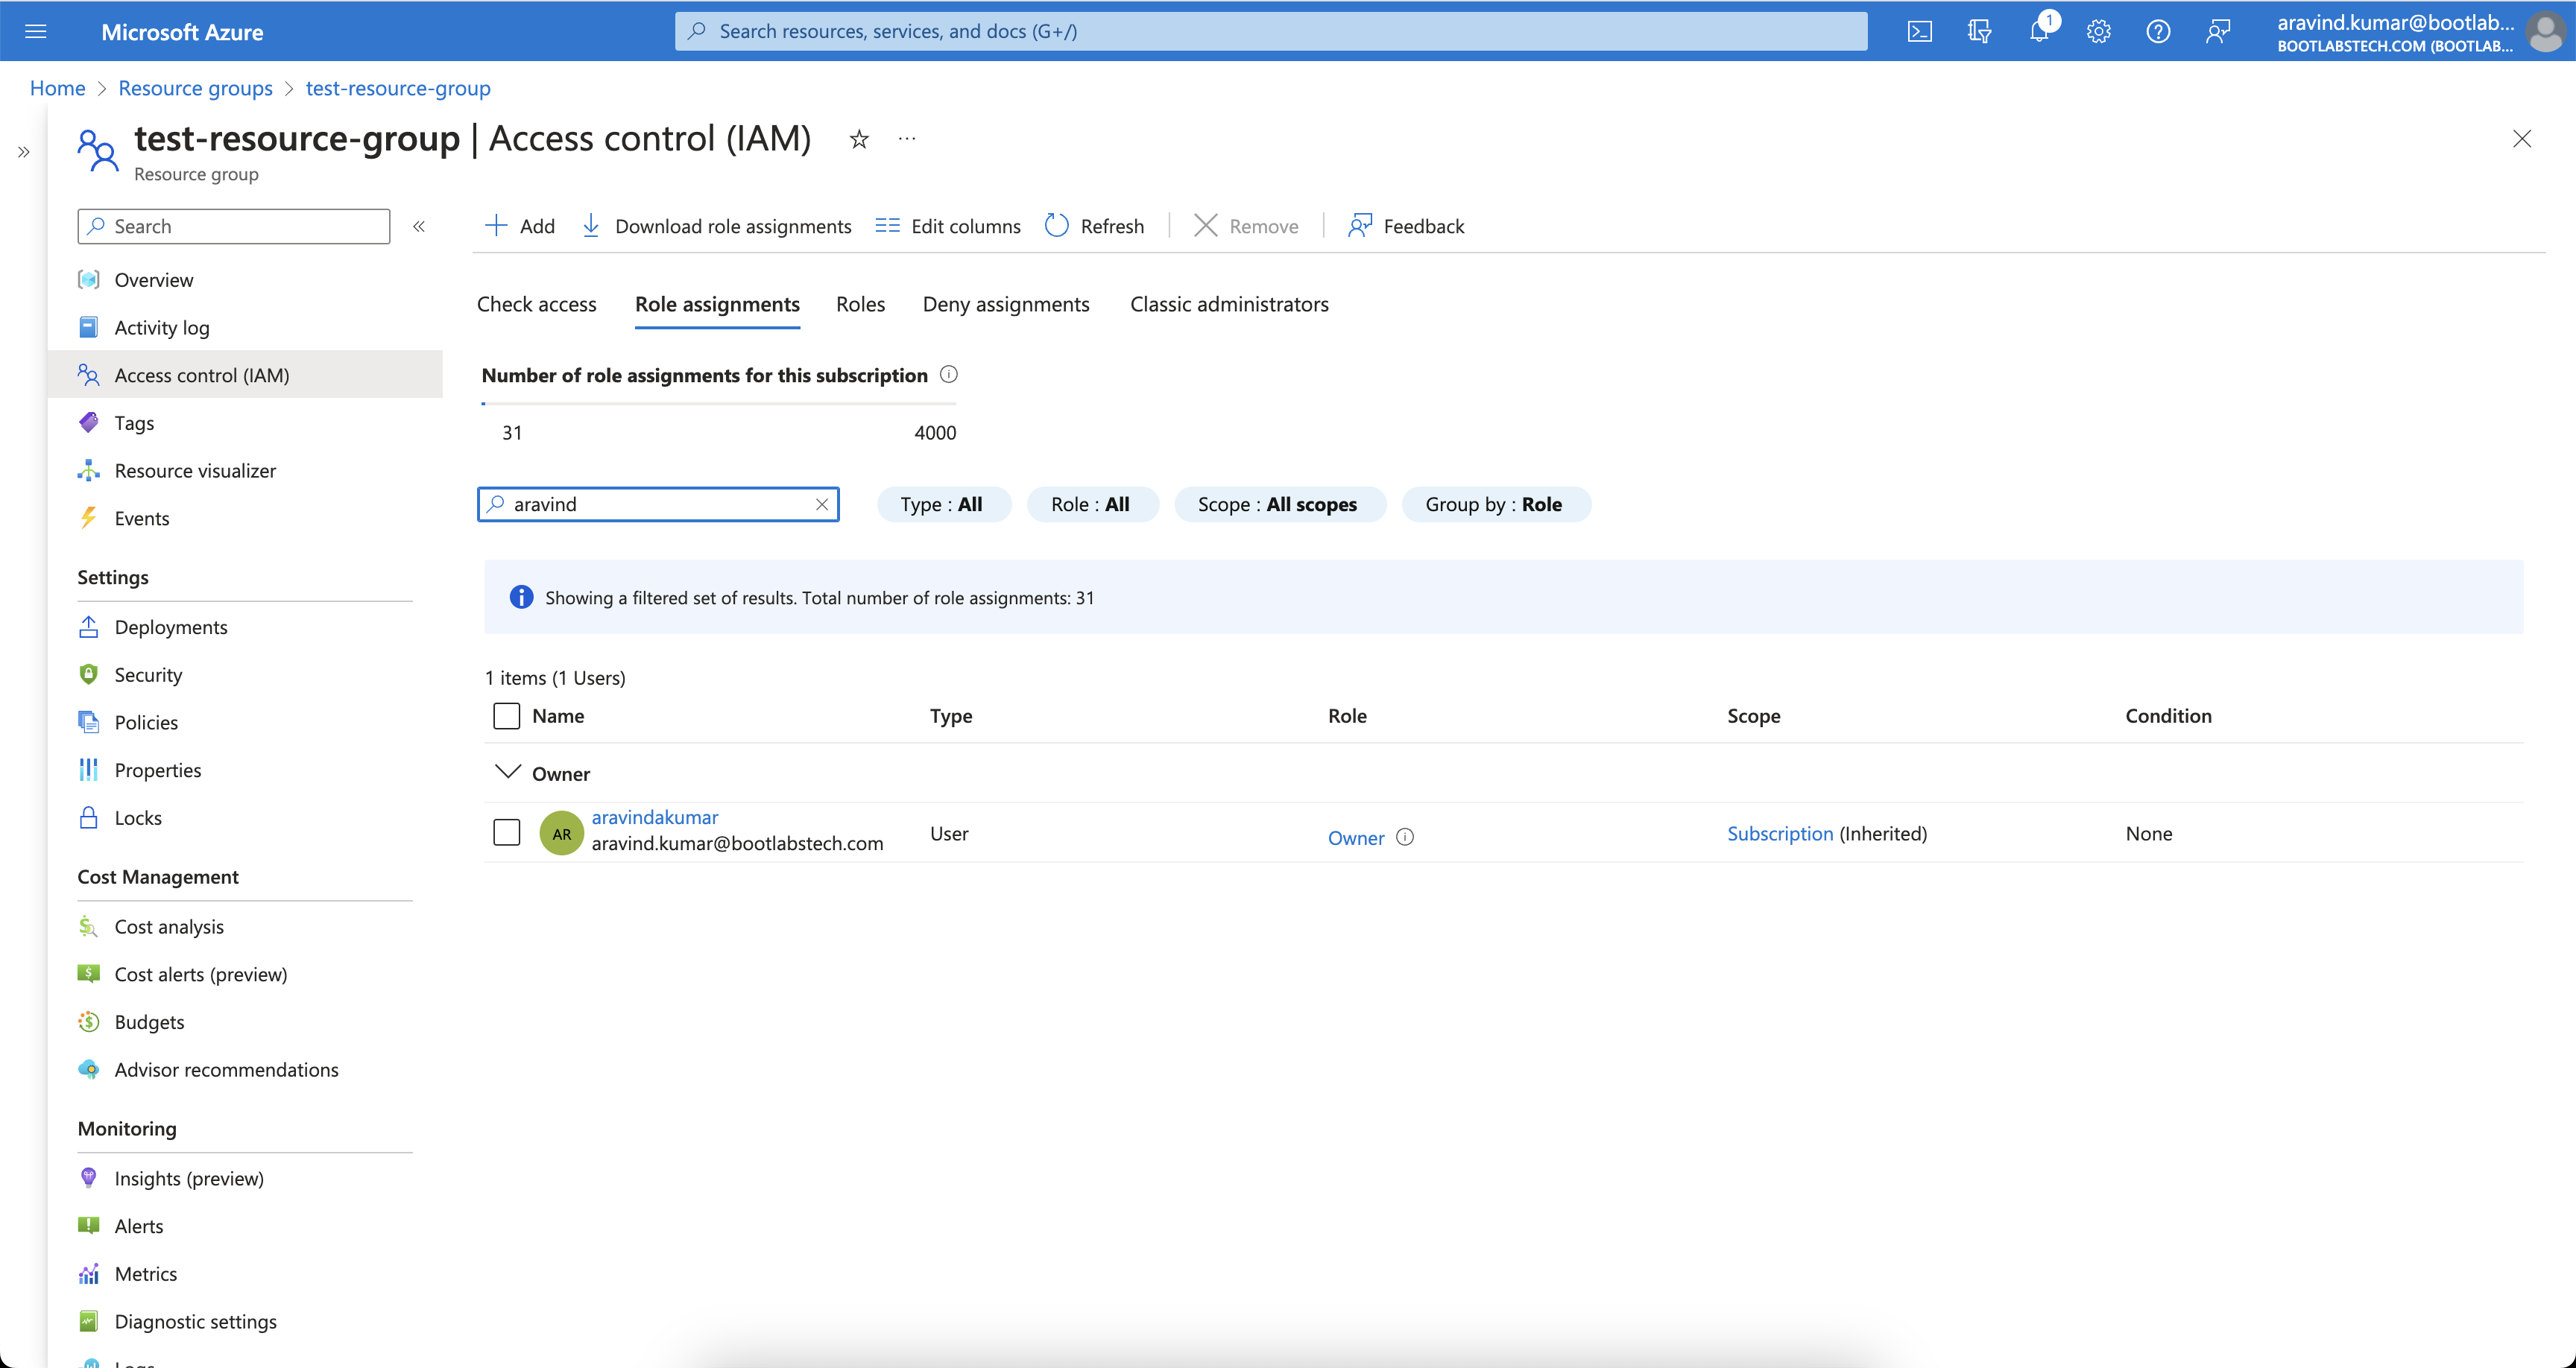
So, this is how Azure's RBAC is hierarchical. Most enterprise software uses hierarchical RBAC because of the hierarchical nature of the resource levels. In this tutorial, we'll try to implement a similar system using Casbin.

How Does Casbin Work?

Before diving into the implementation, it is important to understand what Casbin is and how it functions at a high level. This understanding is necessary because each Role-Based Access Control (RBAC) system may vary based on specific requirements. By grasping the workings of Casbin, we can effectively fine-tune the model.

What is ACL?

ACL stands for Access Control List. It is a method in which users are mapped to actions and actions to resources.

The model definition

Let's consider a simple example of an ACL model.

[request_definition]
r = sub, act, obj

[policy_definition]
p = sub, act, obj

[policy_effect]
e = some(where (p.eft == allow))

[matchers]
m = r.sub == p.sub && r.obj == p.obj && r.act == p.act
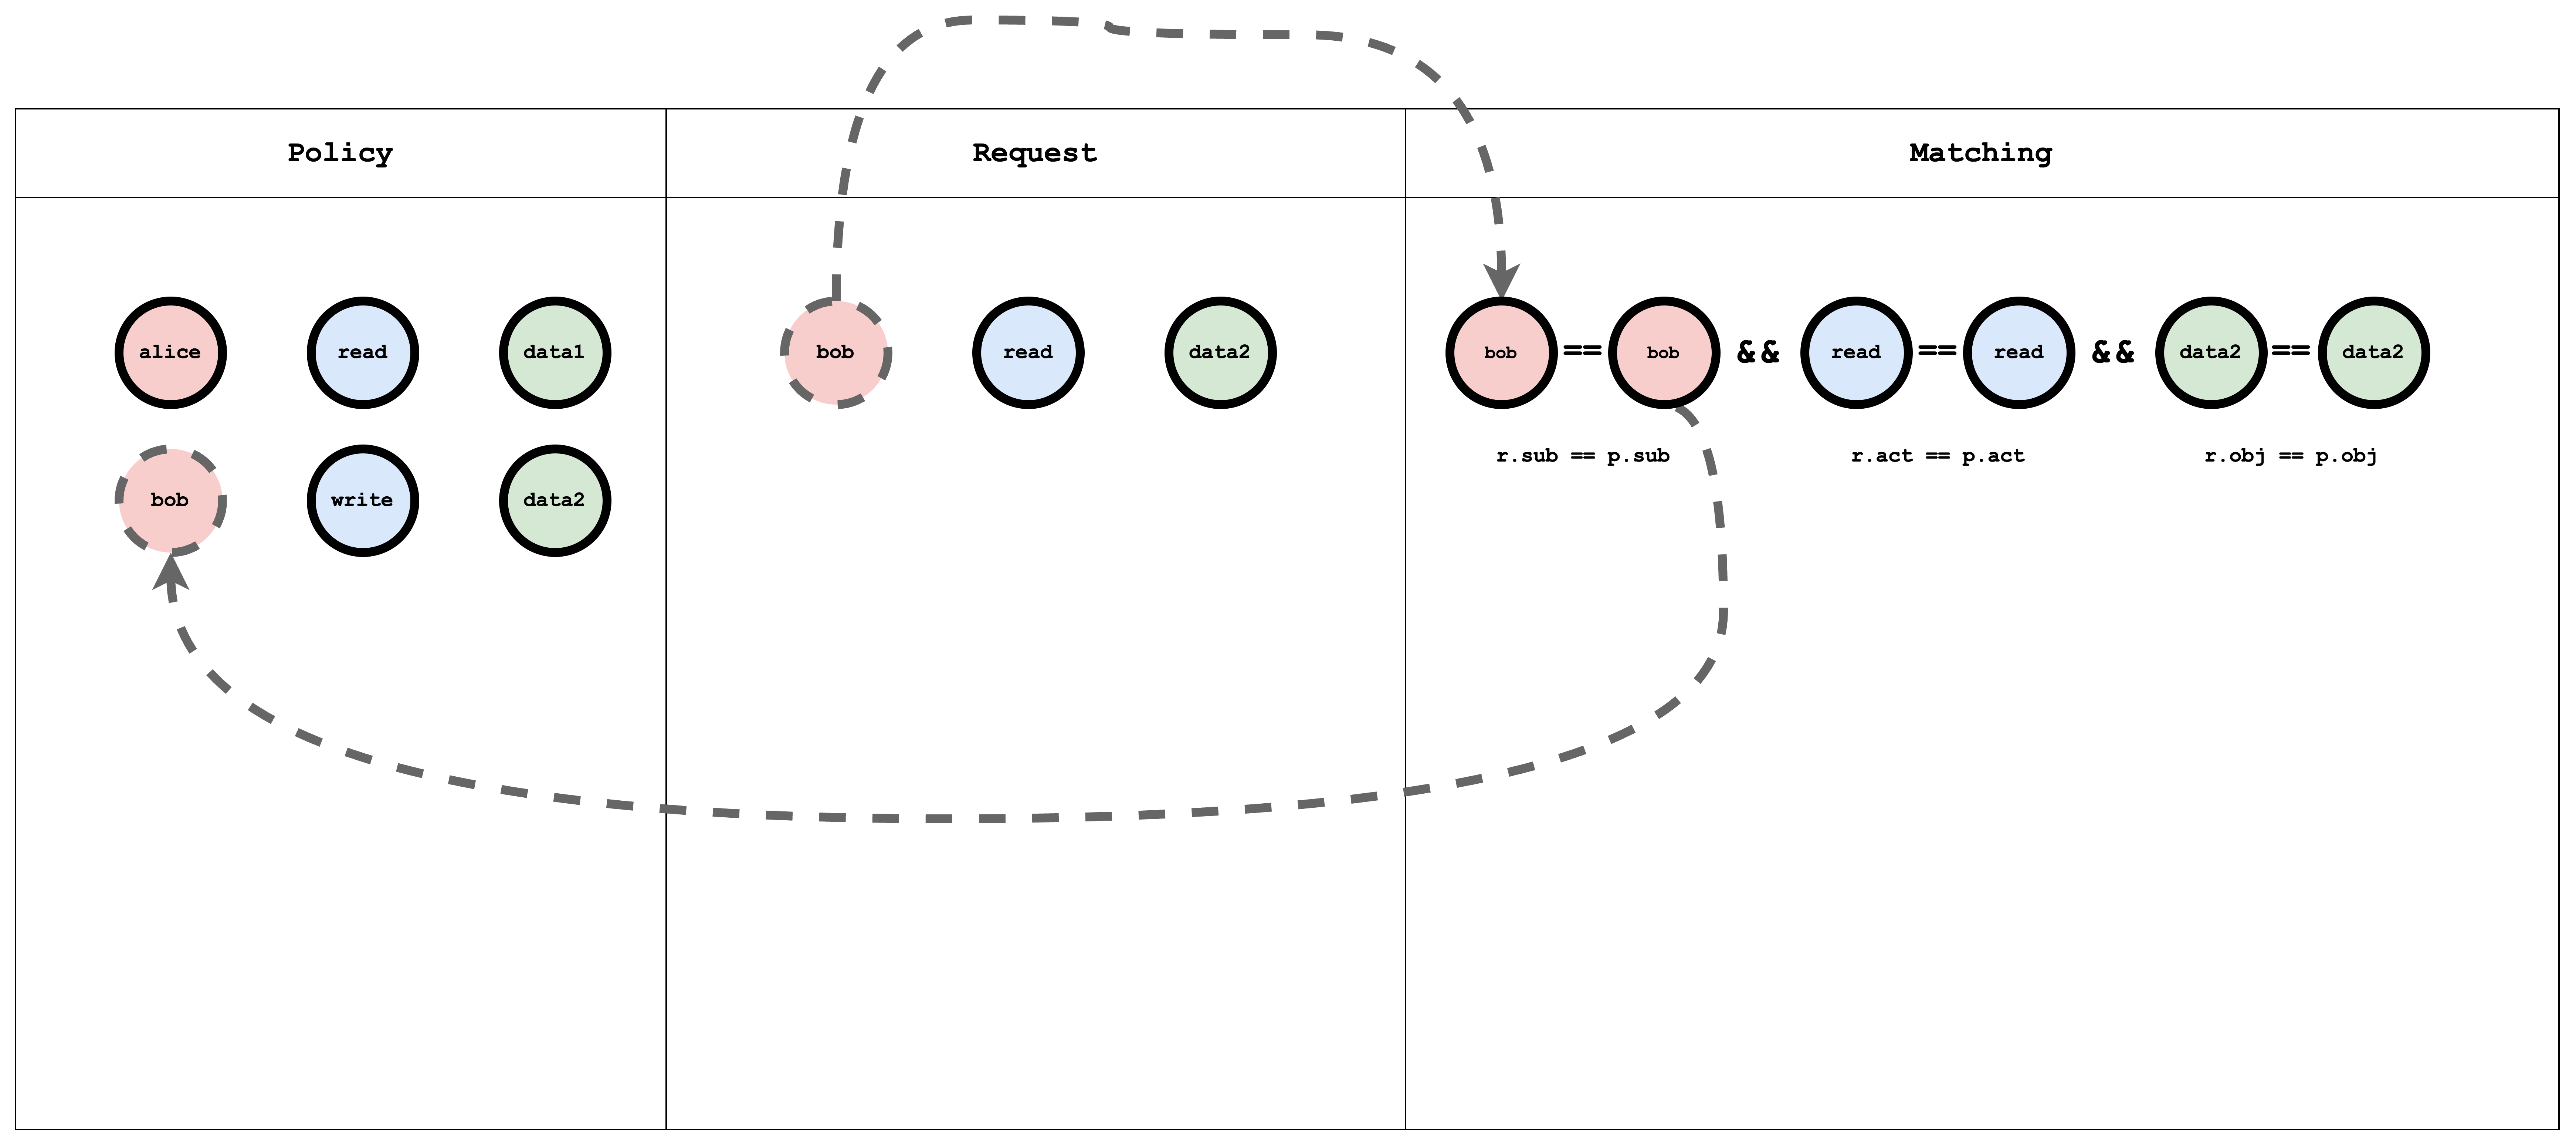
  1. The request_definition is the query template of the system. For example, a request alice, write, data1 can be interpreted as "Can subject Alice perform the action 'write' on object 'data1'?".

  2. The policy_definition is the assignment template of the system. For example, by creating a policy alice, write, data1, you are assigning permission to subject Alice to perform the action 'write' on object 'data1'.

  3. The policy_effect defines the effect of the policy.

  4. In the matchers section, the request is matched with the policy using the conditions r.sub == p.sub && r.obj == p.obj && r.act == p.act.

Now let's test the model on the Casbin editor

Open the editor and paste the above model in the Model editor.

Paste the following in the Policy editor:

p, alice, read, data1
p, bob, write, data2

and the following in the Request editor:

alice, read, data1

The result will be:

true

Visual representation of the ACL model, policy, and request matching

acl

What is RBAC?

RBAC stands for Role-Based Access Control. In RBAC, a user is assigned a role for a resource, and a role can contain arbitrary actions. The request then checks if the user has the permission to perform the action on the resource.

The model definition

Let's consider a simple example RBAC model:

[request_definition]
r = sub, act, obj

[policy_definition]
p = sub, act, obj

[role_definition]
g = _, _
g2 = _, _

[policy_effect]
e = some(where (p.eft == allow))

[matchers]
m = r.sub == p.sub && g(p.act, r.act) && r.obj == p.obj
  1. The role_definition is a graph relation builder that uses a Graph to compare the request object with the policy object.

Now let's test the model on Casbin editor

Open the editor and paste the above model in the Model editor.

Paste the following in the Policy editor:

p, alice, reader, data1
p, bob, owner, data2

g, reader, read
g, owner, read
g, owner, write

and the following in the Request editor:

alice, read, data1
alice, write, data1
bob, write, data2
bob, read, data2
bob, write, data1

The result will be:

true
false
true
true
false

Visual representation of the RBAC model, policy, and request matching

rbac

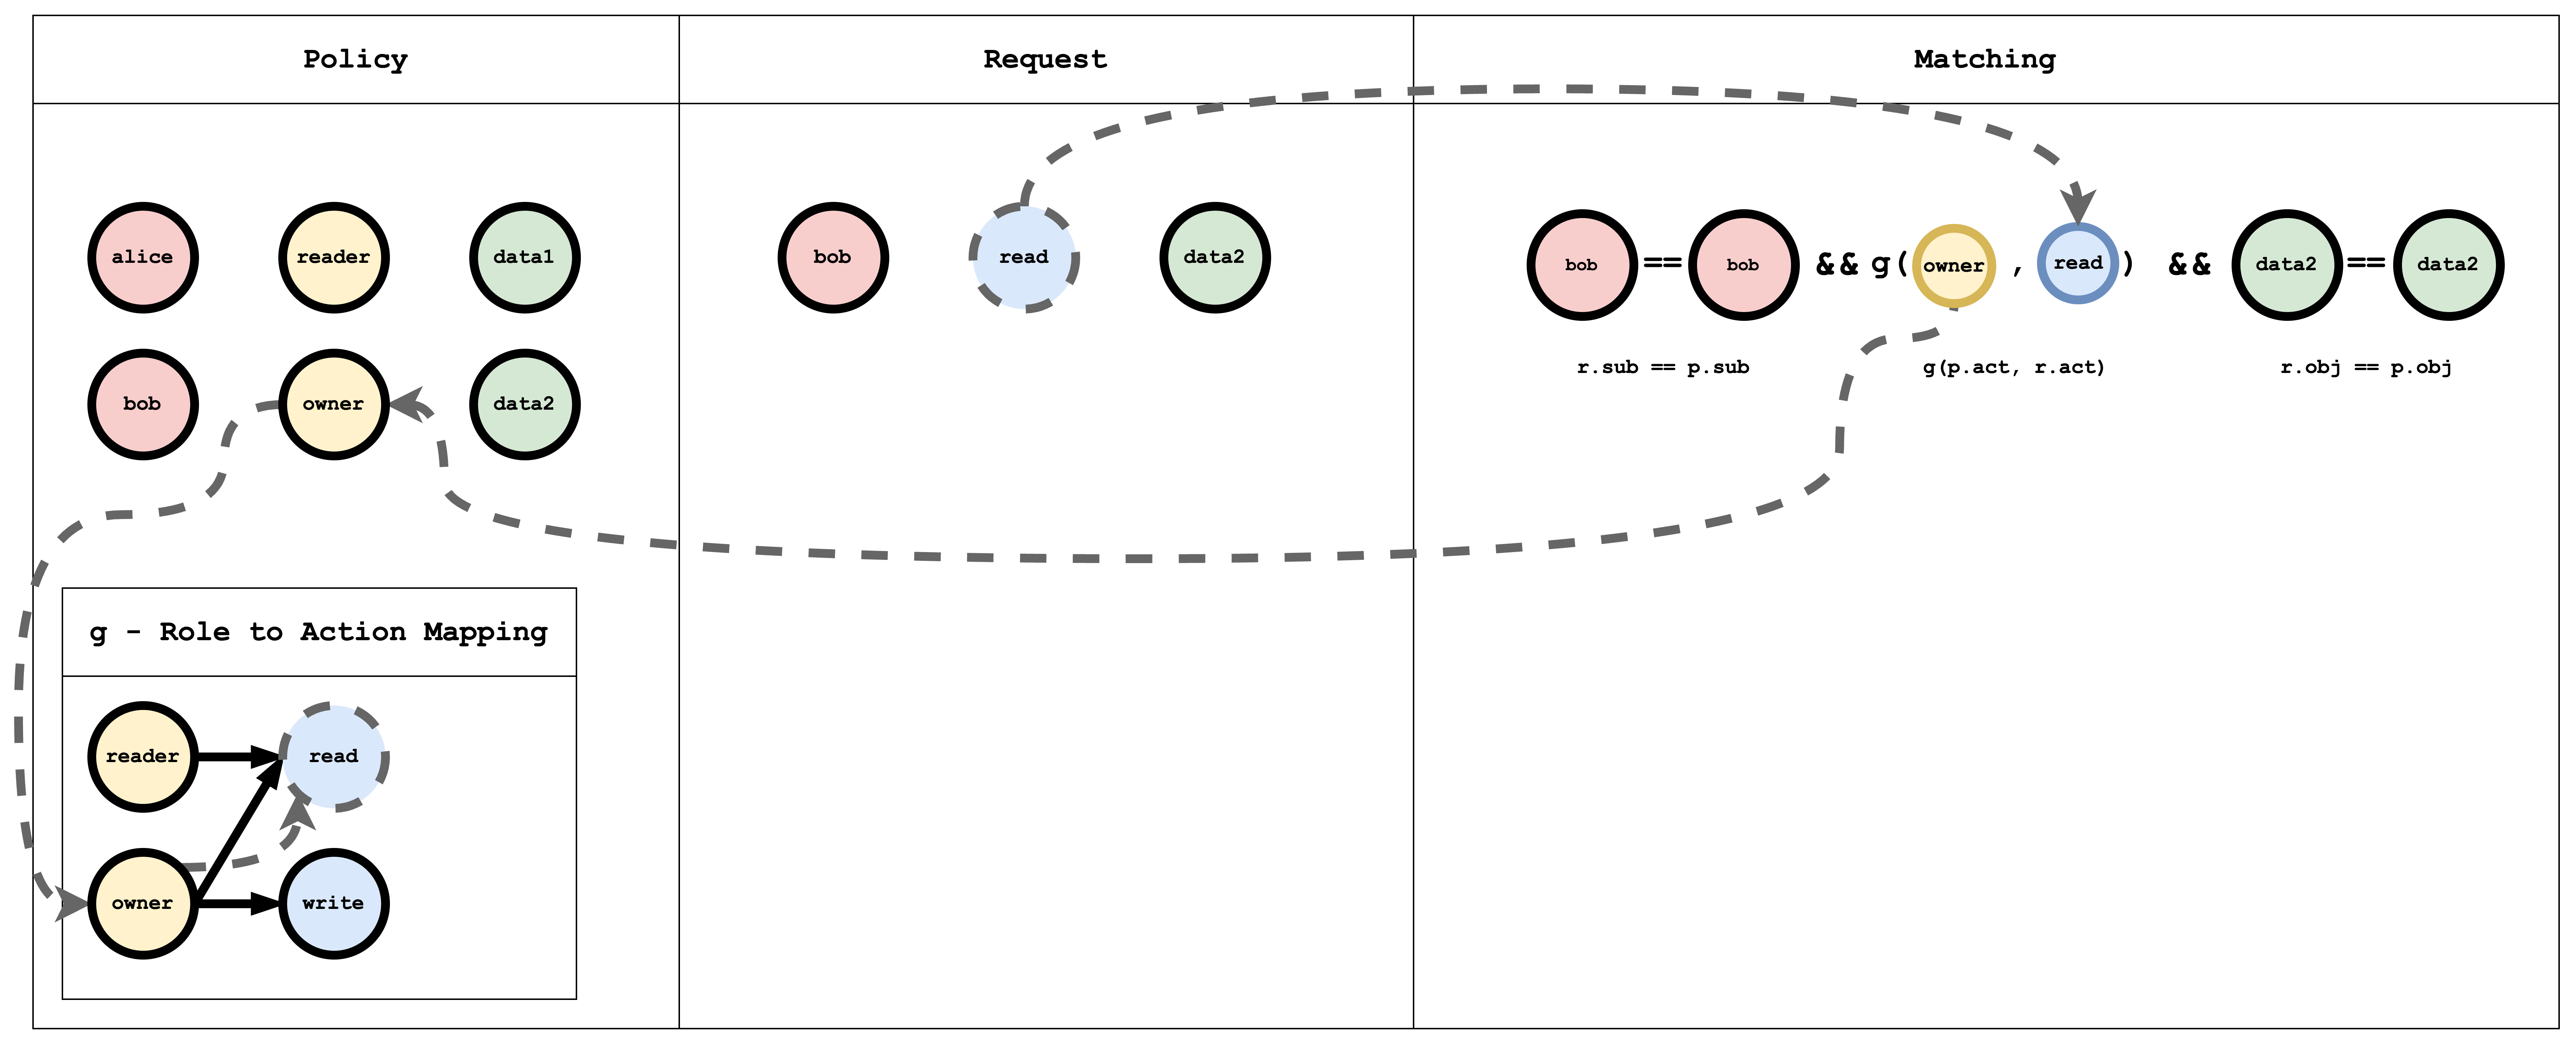
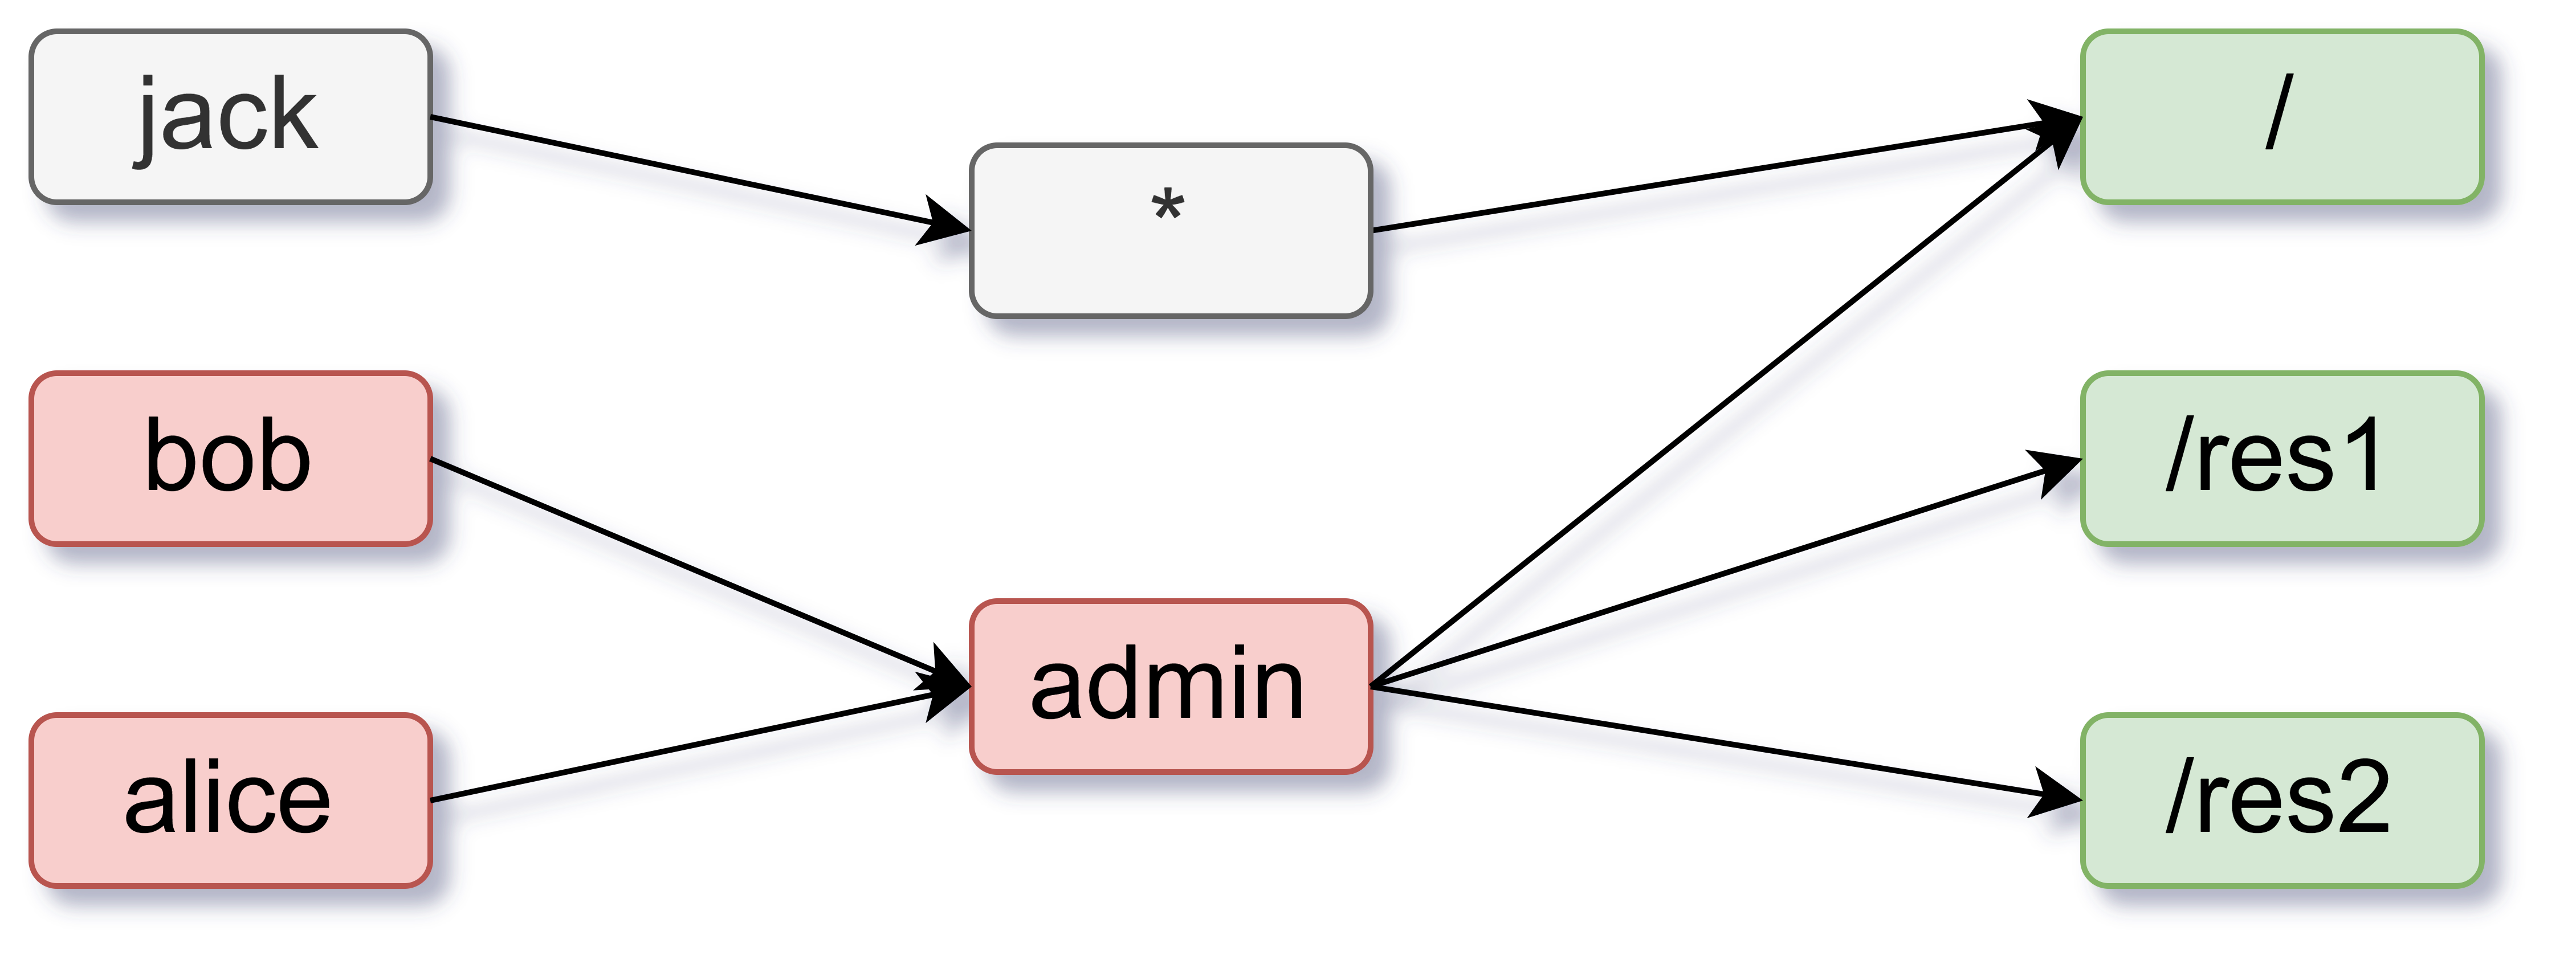
The g - Role to action mapping table has a Graph mapping the role to action. This Graph can be coded as a list of edges, as shown in the policy which is a common way of representing a Graph:

g, reader, read
g, owner, read
g, owner, write
bilgi

p indicates a normal policy that can be compared using the == operator. g is a Graph-based comparison function. You can define multiple Graph comparators by adding a numerical suffix like g, g2, g3, ... and so on.

What is Hierarchical RBAC?

In Hierarchical RBAC, there are more than one type of resources and there is an inheritance relationship between the resource types. For example, "subscription" is one type and "resourceGroup" is another type. A sub1 of type Subscription can contain multiple resourceGroups (rg1, rg2) of type ResourceGroup.

Similar to the resource hierarchy, there will be two types of roles and actions: Subscription roles and actions, and ResourceGroup roles and actions. There is an arbitrary relationship between the Subscription role and ResourceGroup role. For example, consider a Subscription Role sub-owner. This role is inherited by a ResourceGroup Role rg-owner, which means that if I am assigned the sub-owner role on Subscription sub1, then I automatically also get the rg-owner role on rg1 and rg2.

The model definition

Let's take a simple example of the Hierarchical RBAC model:

[request_definition]
r = sub, act, obj

[policy_definition]
p = sub, act, obj

[role_definition]
g = _, _
g2 = _, _

[policy_effect]
e = some(where (p.eft == allow))

[matchers]
m = r.sub == p.sub && g(p.act, r.act) && g2(p.obj, r.obj)
  1. The role_definition is a graph relation builder which uses a Graph to compare the request object with the policy object.

Now let's test the model on the Casbin editor

Open the editor and paste the above model in the Model editor.

Paste the following in the Policy editor:

p, alice, sub-reader, sub1
p, bob, rg-owner, rg2

// subscription role to subscription action mapping
g, sub-reader, sub-read
g, sub-owner, sub-read
g, sub-owner, sub-write

// resourceGroup role to resourceGroup action mapping
g, rg-reader, rg-read
g, rg-owner, rg-read
g, rg-owner, rg-write

// subscription role to resourceGroup role mapping
g, sub-reader, rg-reader
g, sub-owner, rg-owner

// subscription resource to resourceGroup resource mapping
g2, sub1, rg1
g2, sub2, rg2

And paste the following in the Request editor:

alice, rg-read, rg1

The result will be:

true

Visual representation of the RBAC model, policy, and request matching

hrbac

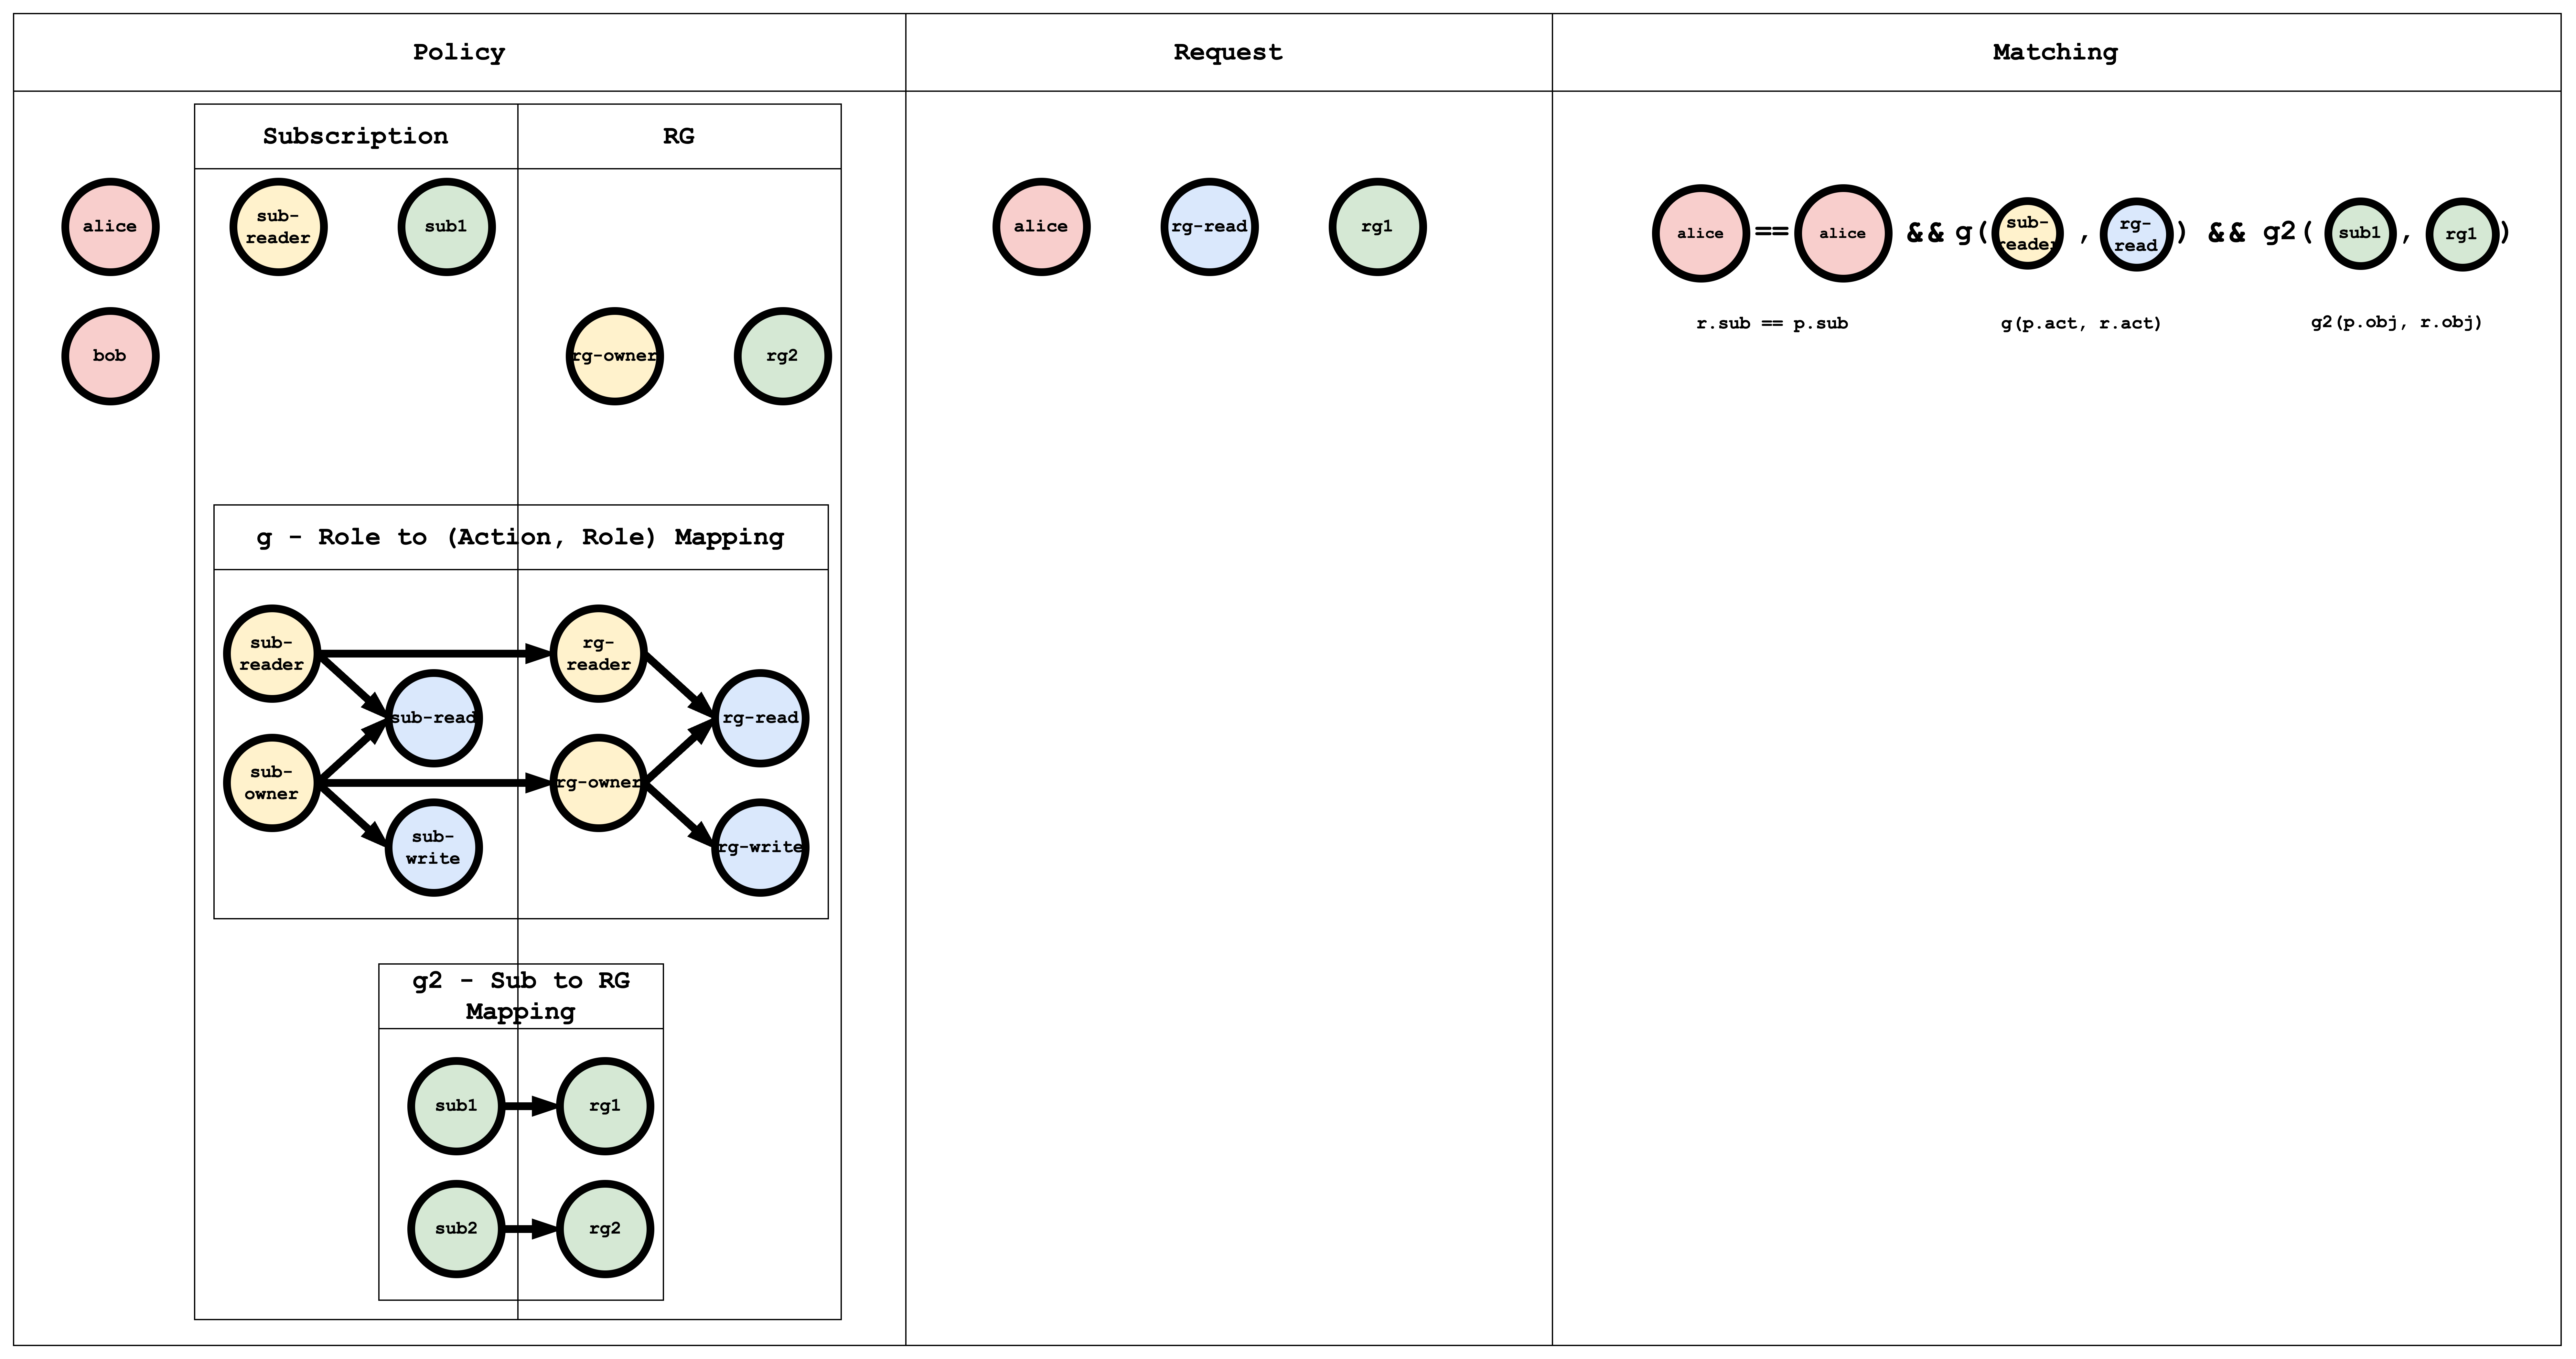
The g - Role to (Action, Role) Mapping table has a graph mapping the role to the action, role mapping. This graph can be coded as a list of edges, as shown in the policy, which is a common way of representing a graph:

// subscription role to subscription action mapping
g, sub-reader, sub-read
g, sub-owner, sub-read
g, sub-owner, sub-write

// resourceGroup role to resourceGroup action mapping
g, rg-reader, rg-read
g, rg-owner, rg-read
g, rg-owner, rg-write

// subscription role to resourceGroup role mapping
g, sub-reader, rg-reader
g, sub-owner, rg-owner

The g2 - Sub to RG Mapping table has a graph mapping subscription to resourceGroup:

// subscription resource to resourceGroup resource mapping
g2, sub1, rg1
g2, sub2, rg2

Subject Matching Visual representation

hrbac-sub-match

Action Matching Visual representation

hrbac-act-match

Object Matching Visual representation

hrbac-obj-match

bilgi

When a request is submitted to Casbin, this matching happens for all the policies. If at least one policy matches, then the result of the request is true. If no policy matches the request, then the result is false.

Conclusion

In this tutorial, we learned about how different authorization models work and how they can be modeled using Casbin. In the second part of this tutorial, we will implement this in a demo Spring Boot Application and secure the APIs using Casbin.

· 5 dakika okuma
Rushikesh Tote

Giriş

APISIX, Nginx ve etcd üzerine kurulu yüksek performanslı ve ölçeklenebilir bir bulut yerel API ağ geçididir. Apache Yazılım Vakfı tarafından yürütülen açık kaynaklı bir projedir. APISIX'in bu kadar iyi olmasının yanı sıra, kimlik doğrulama, izleme, yönlendirme gibi özellikleri uygulamak için kullanılabilecek birçok harika yerleşik eklenti desteği bulunmaktadır. APISIX'teki eklentilerin yeniden başlatmalar olmadan sıcak yüklenebilmesi, onu çok dinamik kılmaktadır.

Ancak APISIX kullanırken, uygulamanızda karmaşık yetkilendirme mantığı eklemek isteyebileceğiniz senaryolar olabilir. İşte burada authz-casbin size yardımcı olabilir, authz-casbin, çeşitli erişim kontrol modellerine dayalı güçlü yetkilendirme sağlayan Lua Casbin tabanlı bir APISIX eklentisidir. Casbin, ACL, RBAC, ABAC gibi erişim kontrol modellerini destekleyen bir yetkilendirme kütüphanesidir. Başlangıçta Go dilinde yazılmış olan Casbin, birçok dilde port edilmiştir ve Lua Casbin, Casbin'in Lua uygulamasıdır. authz-casbin'in geliştirilmesi, APISIX deposunda yetkilendirme için yeni bir eklenti önerdiğimizde (#4674) çekirdek üyelerin de onay vermesiyle başladı. Ve yararlı incelemeler sonucu bazı önemli değişiklikler ve iyileştirmeler yapıldıktan sonra, PR (#4710) nihayet birleştirildi.

Bu blogda, authz-casbin eklentisini kullanarak APISIX'te Rol Tabanlı Erişim Kontrolü (RBAC) temelli bir yetkilendirme modelinin nasıl uygulanabileceğini göstereceğiz.

NOT: Casbin sadece yetkilendirme yapacağı için kullanıcının kimlik doğrulaması için başka bir eklenti veya özel bir iş akışı kullanmanız gerekecektir.

Model Oluşturma

Eklenti, herhangi bir isteği yetkilendirmek için üç parametre kullanır - konu, nesne ve eylem. Burada, konu, kullanıcı adı başlığının değeridir ve [username: alice] gibi bir şey olabilir. Ardından, nesne erişilmekte olan URL yolu ve eylem kullanılan istek yöntemidir.

Diyelim ki /, /res1 ve /res2 yollarında üç kaynakla bir model oluşturmak istiyoruz. Ve şöyle bir model istiyoruz:

resim

Bu, örneğin jack gibi tüm kullanıcıların (*) anasayfasına (/) erişebileceği anlamına gelir. Ve alice ve bob gibi admin izinlerine sahip kullanıcılar tüm sayfalara ve kaynaklara (örneğin res1 ve res2) erişebilir. Ayrıca, admin izni olmayan kullanıcıların sadece GET istek yöntemini kullanmasını kısıtlayalım. Bu senaryo için modeli şu şekilde tanımlayabiliriz:

[request_definition]
r = sub, obj, act

[policy_definition]
p = sub, obj, act

[role_definition]
g = _, _

[policy_effect]
e = some(where (p.eft == allow))

[matchers]
m = (g(r.sub, p.sub) || keyMatch(r.sub, p.sub)) && keyMatch(r.obj, p.obj) && keyMatch(r.act, p.act)

Politika oluşturma

Yukarıdaki senaryodan, politika şu şekilde olacaktır:

p, *, /, GET
p, admin, *, *
g, alice, admin
g, bob, admin

Modelden gelen eşleştirici şu anlama gelir:

  1. (g(r.sub, p.sub) || keyMatch(r.sub, p.sub)): İsteğin konusu, politikanın konusu olarak bir rolü taşıyor ya da isteğin konusu, keyMatch içinde politikanın konusuyla eşleşiyor. keyMatch, Lua Casbin'de yerleşik bir fonksiyondur, fonksiyonun açıklamasına ve daha faydalı olabilecek diğer fonksiyonlara buradan göz atabilirsiniz.
  2. keyMatch(r.obj, p.obj): İsteğin nesnesi, politikanın nesnesiyle eşleşiyor (burada URL yolu).
  3. keyMatch(r.act, p.act): İsteğin eylemi, politikanın eylemiyle eşleşiyor (burada HTTP istek metodu).

Eklentiyi rotada etkinleştirme

Modeli ve politikayı oluşturduktan sonra, APISIX Admin API'sini kullanarak bunu bir rotada etkinleştirebilirsiniz. Model ve politika dosyası yollarını kullanarak etkinleştirmek için:

curl http://127.0.0.1:9080/apisix/admin/routes/1 -H 'X-API-KEY: edd1c9f034335f136f87ad84b625c8f1' -X PUT -d '
{
"plugins": {
"authz-casbin": {
"model_path": "/path/to/model.conf",
"policy_path": "/path/to/policy.csv",
"username": "username"
}
},
"upstream": {
"nodes": {
"127.0.0.1:1980": 1
},
"type": "roundrobin"
},
"uri": "/*"
}'

Burada, kullanıcı adı alanı, konuyu ileteceğiniz başlık adıdır. Örneğin, kullanıcı adı başlığını user: alice olarak iletecekseniz, "username": "user" kullanırsınız.

Dosyalar yerine model/politika metni kullanmak için, model ve policy alanlarını kullanabilirsiniz:

curl http://127.0.0.1:9080/apisix/admin/routes/1 -H 'X-API-KEY: edd1c9f034335f136f87ad84b625c8f1' -X PUT -d '
{
"plugins": {
"authz-casbin": {
"model": "[request_definition]
r = sub, obj, act

[policy_definition]
p = sub, obj, act

[role_definition]
g = _, _

[policy_effect]
e = some(where (p.eft == allow))

[matchers]
m = (g(r.sub, p.sub) || keyMatch(r.sub, p.sub)) && keyMatch(r.obj, p.obj) && keyMatch(r.act, p.act)",

"policy": "p, *, /, GET
p, admin, *, *
g, alice, admin
g, bob, admin",

"username": "username"
}
},
"upstream": {
"nodes": {
"127.0.0.1:1980": 1
},
"type": "roundrobin"
},
"uri": "/*"
}'

Eklentiyi global bir model/politika kullanarak etkinleştirme

Birden fazla rotada tek bir model ve politika yapılandırması kullanmak isteyebileceğiniz durumlar olabilir. Bunu, öncelikle model ve politika yapılandırmasını eklentinin meta verilerine eklemek için bir PUT isteği göndererek yapabilirsiniz:

curl http://127.0.0.1:9080/apisix/admin/plugin_metadata/authz-casbin -H 'X-API-KEY: edd1c9f034335f136f87ad84b625c8f1' -i -X PUT -d '
{
"model": "[request_definition]
r = sub, obj, act

[policy_definition]
p = sub, obj, act

[role_definition]
g = _, _

[policy_effect]
e = some(where (p.eft == allow))

[matchers]
m = (g(r.sub, p.sub) || keyMatch(r.sub, p.sub)) && keyMatch(r.obj, p.obj) && keyMatch(r.act, p.act)",

"policy": "p, *, /, GET
p, admin, *, *
g, alice, admin
g, bob, admin"
}'

Ve sonra aynı yapılandırmayı bazı rotalarda etkinleştirmek için, Admin API'sini kullanarak bir istek gönderin:

curl http://127.0.0.1:9080/apisix/admin/routes/1 -H 'X-API-KEY: edd1c9f034335f136f87ad84b625c8f1' -X PUT -d '
{
"plugins": {
"authz-casbin": {
"username": "username"
}
},
"upstream": {
"nodes": {
"127.0.0.1:1980": 1
},
"type": "roundrobin"
},
"uri": "/route1/*"
}'

Bu, eklenti meta veri yapılandırmasını rotaya ekleyecektir. Eklenti meta veri yapılandırmasını, güncellenmiş model ve politika yapılandırması ile isteği yeniden göndererek kolayca güncelleyebilirsiniz, eklenti otomatik olarak eklenti meta verisini kullanan tüm rotaları güncelleyecektir.

Kullanım Senaryoları

  • Bu eklentinin birincil kullanım senaryosu, API'lerinizde yetkilendirmeyi uygulamak olacaktır. Bu eklentiyi, yetkilendirme modeliniz ve politika yapılandırmanızla kullanmakta olduğunuz herhangi bir API rotasına kolayca ekleyebilirsiniz.
  • Tüm API'leriniz için tek bir yetkilendirme modeline sahip olmak istiyorsanız, global model/politika yöntemini kullanabilirsiniz. Bu, politika güncellemesini tüm rotalar için kolaylaştırır, çünkü sadece etcd'deki meta verileri güncellemeniz yeterlidir.
  • Eğer her farklı rotaya farklı bir model kullanmak istiyorsanız, rota yöntemini kullanabilirsiniz. Bu, farklı API rotalarının farklı kullanıcı izinlerine sahip olduğunda yardımcı olur. Ayrıca, daha büyük politikalarla uğraşırken bunu kullanabilirsiniz, çünkü bu, yetkilendirmeyi birden çok rota filtrelendiğinde daha hızlı yapacaktır.

· Bir dakika okuma
Casbin

Bugün, Casbin'in kurucusunun, Yang Luo'nun 2019 Q3'te Casbin, Npcap ve Nmap üzerindeki çalışmaları nedeniyle "Google Açık Kaynak Eş Ödülü kazananları" arasında yer aldığını duyurmaktan mutluluk duyuyoruz.

ospb

Orijinal ödül mektubu buradan erişilebilir.

Google Open Source Peer Bonus programı şu şekilde açıklanmaktadır:

Bir Google Peer Bonus, özellikle aşan bir Google çalışanını tanıtmak için kullanılırken, bir Open Source Peer Bonus, açık kaynaklı projelere olağanüstü katkılarda bulunan dış kişileri tanımak için kullanılır.

2019 yılı kazananları için duyurusu şu adreste mevcuttur:

https://opensource.googleblog.com/2020/01/announcing-2019-second-cycle-google.html

Yang ve Casbin, Git, TensorFlow, V8, CPython, LLVM, Apache projeleri, Angular veya Jenkins gibi açık kaynak geliştiricileri ve projeleri arasında önemli bir etkiye sahip olarak listelenmiştir.

Casbin'in açık kaynak ve bulut güvenliği için yaptığı katkıları bu şekilde tanıdığını görmekten memnuniyet duyuyoruz!

Casbin ile uçuş için teşekkürler!

· Bir dakika okuma
Yang Luo

Bugün, Casbin'in dokümantasyonunu GitHub Wiki'den bu web sitesinin Docs bölümüne taşıdık, Docusaurus, daha iyi Markdown stilleri, tam metin arama, sürüm oluşturma, çeviri gibi birçok harika özelliği sunar.

Dokümantasyon henüz mükemmel değil ve hâlâ ayarlama gerektiriyor. Kaynak kodu GitHub'da barındırılıyor: https://github.com/casbin/casbin-website-v2 .

Her türlü katkı veya öneri hoş geldiniz!

· Bir dakika okuma
Zixuan Liu

Bugün, Casbin'i Node.js'ye başarıyla taşıdık, adı:

node-Casbin Casbin'in diğer uygulamalarıyla benzer kullanımı ve API'ye sahiptir. Express, Koa2 ve Egg.js için ara yazılımlar kullanıma hazırdır. Sequelize için depolama adaptörü de hazırlandı.

Umarım ihtiyaçlarınızı iyi karşılar :)

GitHub: https://github.com/casbin/node-casbin

· Bir dakika okuma
Helong Zhang

Bazı müşterilerimiz, Casbin'in bir kütüphane yerine bir hizmet olarak kullanılıp kullanılamayacağını soruyor. Cevap EVET. Bugün, Erişim Kontrolü Olarak Hizmet için somut bir çözüm olarak Casbin Server projemizi başlattık.

Casbin Server, çekirdek ekibimiz tarafından aktif olarak geliştirilmektedir. Çeşitli özelliklere sahiptir:

  • Sadece Golang ile geliştirilmiştir.
  • Binlerce Casbin örneğini yönetebilir, böylece politikaların uygulanması mantığını birden fazla hizmetten tek bir Casbin Server'a taşıyabilirsiniz.
  • gRPC, Casbin Server ile iletişim kurmak için kullanılır. Yakın gelecekte RESTful desteğini de eklemeyi düşünüyoruz.
  • Geliştirici olmayan yöneticilerin Casbin örnekleri, modeller, politikaların depolanması ve yük dengeleme gibi tüm detayları yönetmeleri için kullanışlı bir web yönetici portalı sağlanmıştır.

Kaynak kodu GitHub'da barındırılır: https://github.com/casbin/casbin-server

Herhangi bir sorun veya çekme isteği hoş geldiniz :)